Best Arms Workout at Home Without Equipment

Do you want to have well-defined, toned arms but don’t have access to a well-stocked gym? Do not be alarmed! A room full of dumbbells and machines is not necessary to develop remarkable arm strength. Workouts that may be done at home are surprisingly simple and effective.
We’re going to go over a number of arm workouts in this tutorial that only need the space in your living room and your willpower. Let’s explore a world of workouts that won’t require any special equipment and will have you confidently flexing your triceps and biceps. Ready for the Greatest Arms Workout You Can Do at Home Without Equipment? Now let’s get going!
Arm Workouts
A set of exercises intended especially to target and improve the muscles of the arms is referred to as an arm workout.
Exercises for the arms can differ in terms of difficulty, equipment needed, and intensity. Some workouts use resistance bands or dumbbells, while others just use your body weight as resistance. These exercises are designed to activate and test the muscles, encouraging development, stamina, and flexibility.
✔️Push-Ups

One of the most classic bodyweight exercises, push-ups are renowned for their capacity to strengthen and shape the arms, with a focus on the triceps and chest. This exercise is a basic part of every arm workout regimen because it is accessible and adaptable without requiring any special equipment. Let’s look at why push-ups are a great way to build arm strength and some tips for getting the most out of them.
Muscles Targeted:
Push-ups are renowned for engaging multiple muscle groups, making them an effective full-body workout. The primary muscles targeted during push-ups include:
| Triceps Brachii | The muscles on the back of the arms are responsible for elbow extension. |
| Pectoralis Major | The large chest muscle aids in shoulder flexion and adduction. |
| Deltoids | The shoulder muscles are involved in shoulder abduction and overall shoulder stability. |
| Serratus Anterior | A force that plays a crucial role in scapular movement and strength. |
| Rectus Abdominis and Obliques | The core muscles are engaged to maintain a stable plank position. |
Proper Push-Up Form:
Executing push-ups with proper form ensures optimal engagement of the targeted muscles and reduces the risk of injury. Follow these steps:
| Step | Instructions |
| Starting Position | Begin in a plank position with your hands slightly wider than shoulder-width apart. |
| Maintain a straight line from head to heels, engaging your core. | |
| Execution | Lower your body towards the ground by bending your elbows, keeping them close to your body. |
| Descend until your chest is just above the ground or as far as your flexibility allows. | |
| Upward Phase | Push through your palms to extend your arms, returning to the starting position. |
| Fully extend your arms at the top without locking your elbows. | |
| Breathing | Inhale as you lower your body and exhale as you push back up. |
Benefits of Push-Ups for Arm Strength:
| Builds Triceps Strength | The pushing motion of push-ups effectively targets and strengthens the triceps. |
| Tones the Chest Muscles | Regular push-ups contribute to a well-defined and toned chest. |
| Improves Shoulder Stability | The deltoids are engaged, enhancing shoulder stability and strength. |
| Enhances Functional Arm Strength | Push-ups mimic every day pushing movements, translating to improved functional arm strength. |
| Scapular Stabilization | Push-ups promote scapular peace, benefiting overall shoulder health. |
Variations to Challenge Your Arms:
Explore these push-up variations to add variety and challenge to your arm workout:
- Diamond Push-Ups: Targets the triceps and inner chest.
- Wide Grip Push-Ups: Emphasizes the chest muscles.
- Close Grip Push-Ups: Focuses on the triceps and inner chest.
- One-Arm Push-Ups: Intensifies the workout, requiring increased arm and core stability.
✔️Plank
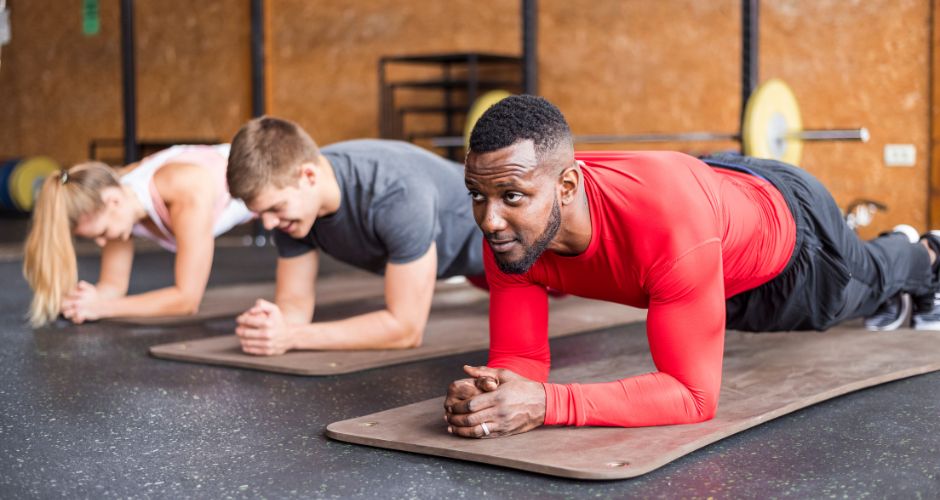
A fundamental exercise that is well-known for its simplicity and efficiency in strengthening the core and giving the arms a good workout is the plank. This is a great complement to any arm workout routine because it is a static posture that engages the entire body. We’ll examine the advantages of the plank exercise, how to perform it correctly, and many modifications to increase arm strength.
Muscles Targeted:
While the primary focus of the plank is on the core, maintaining the position requires engagement from various muscle groups, including:
| Rectus Abdominis | The “six-pack” muscles are responsible for core flexion. |
| Obliques | Forces on the sides of the torso aid in rotation and lateral flexion. |
| Transverse Abdominis | Deep core muscles contribute to stability and support. |
| Erector Spinae | Muscles along the spine that assist in maintaining an upright position. |
| Deltoids | The shoulder muscles are engaged to support the upper body. |
| Triceps Brachii | The forces on the back of the arms engaged in helping the body weight. |
Proper Plank Form:
Executing a plank with proper form ensures optimal targeted muscle engagement and promotes effectiveness. Follow these steps:
| Starting Position | Begin in a push-up position with your hands placed directly under your shoulders. |
| Maintain a straight line from head to heels, engaging your core. | |
| Elbow Plank Variation | For a modified version, lower onto your elbows while keeping your forearms parallel. |
| Alignment | Ensure your body forms a straight line, avoiding sagging or arching in the back. |
| Engage Core Muscles | Tighten your core muscles to support your spine and prevent excessive strain on the lower back. |
| Hold Position | Hold the plank position for the desired duration, starting with 20-30 seconds and gradually increasing as your strength improves. |
| Breathing | Breathe steadily and avoid holding your breath. |
Benefits of Plank for Arm Strength:
| Triceps Engagement | The plank position engages the triceps, contributing to arm strength. |
| Shoulder Stability | Holding the plank requires shoulder stability, enhancing strength in the deltoid muscles. |
| Functional Arm Strength | The plank mimics pushing movements, contributing to functional arm strength. |
| Core and Arm Coordination | The body and arms maintain stability, promoting coordination and overall strength. |
Plank Variations to Challenge Your Arms:
Explore these plank variations to add variety and intensity to your arm workout:
Side Plank:
- Shift onto one arm, lifting the opposite arm towards the ceiling. This variation intensifies the engagement of the arm muscles.
Plank with Shoulder Taps:
- While in the plank position, alternate tapping each shoulder with the opposite hand, challenging arm stability.
Plank Jacks:
- Jump your feet apart and back together while holding the plank, incorporating dynamic movement for increased arm engagement.
You may like HIIT Workouts for Beginners at Home
✔️Arm Circles

Arm circles are a simple yet effective exercise that engages the muscles in your arms and shoulders while promoting flexibility and range of motion. This dynamic movement is an excellent addition to your warm-up routine or as part of a comprehensive arm workout. Let’s explore the benefits, proper technique, and variations of arm circles to enhance your arm strength and flexibility.
Proper Arm Circle Technique:
Performing arm circles with proper technique ensures a safe and effective workout. Follow these steps:
| Starting Position | Stand with your feet shoulder-width apart and extend your arms straight to the sides, parallel to the ground. |
| Circular Motion | Begin making small, controlled circles with your arms in a clockwise direction. |
| Gradually increase the size of the circles while maintaining control and proper form. | |
| Change Direction | After a set duration or number of repetitions, switch to counterclockwise circles. |
| Maintain Posture | Keep your core engaged and maintain a straight and upright posture throughout the exercise. |
| Controlled Pace | Perform the arm circles at a controlled pace to ensure proper engagement of the muscles and reduce the risk of injury. |
Benefits of Arm Circles for Arm Strength and Flexibility:
| Improved Shoulder Mobility | Arm circles promote flexibility and mobility in the shoulder joints, reducing stiffness. |
| Enhanced Blood Circulation | The dynamic movement increases blood flow to the arms, aiding in nutrient delivery and waste removal. |
| Warm-Up for Workouts | Arm circles are an effective warm-up, preparing the muscles and joints for more intense exercises. |
| Toning and Definition | Regularly incorporating arm circles can contribute to toning and defining the powers in the arms and shoulders. |
| Stress Relief | Performing arm circles in a controlled and rhythmic manner can help alleviate shoulder tension and stress. |
| Joint Lubrication | The circular motion helps lubricate the shoulder joints, improving overall joint health. |
Variations of Arm Circles:
Add variety to your arm circle routine with these variations:
| Forward and Backward Arm Circles | Alternate between on and backward circles to target different muscle fibers. |
| Single Arm Circles | Focus on one arm at a time, allowing for more concentrated work on each shoulder. |
| Diagonal Arm Circles | Perform circles at a diagonal angle to engage different parts of the shoulder muscles. |
| Resistance Band Arm Circles | Add a resistance band to increase the challenge and provide resistance during the arm circles. |
✔️Kickboxing Punches

Kickboxing punches are a fun and exciting way to include martial arts aspects to your exercise regimen while toning your arms. This vigorous workout improves cardiovascular health, strengthens your arms, and improves your body’s general coordination. To improve your arm workout, let’s examine the advantages, appropriate form, and variations of kickboxing punches.
Muscles Targeted:
Kickboxing punches engage various muscles in the upper body, including:
| Deltoids | The shoulder muscles are responsible for arm abduction. |
| Triceps and Biceps | The back and front of the upper arm are involved in arm extension and flexion. |
| Forearm Muscles | Engage as you make a fist and rotate your wrists during the punches. |
| Core Muscles | The rotational aspect of the energies activates the core muscles. |
Proper Kickboxing Punch Technique:
Executing kickboxing punches with proper technique ensures an effective and safe workout. Follow these steps:
| Stance | Adopt a proper kickboxing stance with your feet shoulder-width apart, knees slightly bent, and one foot forward for balance. |
| Hand Position | Keep your fists by your face, elbows close to your body, and wrists straight. |
| Jab | Extend your lead hand (left hand if right-handed, and vice versa) straight ahead, rotating your fist to face downward upon extension. |
| Cross | Rotate your backhand (right hand if right-handed, and vice versa) across your body, extending it forward in a straight line. |
| Hook | Bend your elbow at a 90-degree angle and swing your lead arm (left arm if right-handed, and vice versa) in a circular motion, targeting the side of your opponent’s face. |
| Uppercut | Bend your elbow at a 90-degree angle and thrust your backhand (right hand if right-handed, and vice versa) upward, aiming for the chin. |
| Full-Body Rotation | Engage your core muscles and rotate your hips and shoulders with each punch to maximize power and coordination. |
Benefits of Kickboxing Punches for Arm Strength:
| Total Arm Workout | Kickboxing punches target the entire arm, including the shoulders, triceps, and forearms. |
| Cardiovascular Endurance | The fast-paced nature of kickboxing punches elevates your heart rate, contributing to improved cardiovascular fitness. |
| Enhanced Coordination | Coordinating punches with footwork and body rotation enhances overall coordination. |
| Stress Relief | The intensity of kickboxing punches provides a cathartic release, helping to alleviate stress and tension. |
Variations of Kickboxing Punches:
Add variety to your kickboxing punch routine with these variations:
| Speed Punches | Increase the pace of your punches to focus on speed and agility. |
| Power Punches | Emphasize power by slowing down the punches and engaging maximum muscle force. |
| Combination Punches | Combine different punches into fluid combinations for a more complex and challenging workout. |
| Shadow Boxing | Practice kickboxing punches in front of a mirror or imaginary opponent to refine technique and form. |
✔️Superman

The Superman exercise is a great way to incorporate strength training for your arms since it mimics the renowned superhero’s flying pose. It works your back muscles mostly, but it works your arms too, so it’s a dynamic full-body exercise. Let’s examine the advantages, appropriate form, and modifications of the Superman exercise to improve your general fitness and arm strength.
Proper Superman Exercise Technique:
Executing the Superman exercise with proper form is critical to maximizing its benefits. Follow these steps:
| Starting Position | Face down on a mat with your arms extended straight in front of you and your legs fully developed. |
| Lift Upper Body | Simultaneously lift your chest, arms, and thighs off the ground, focusing on using your back muscles. |
| Engage Core | Squeeze your glutes and engage your core to maintain straight lines from head to toe. |
| Hold the Superman Pose | Hold the lifted position for a few seconds, emphasizing the contraction in your back and arms. |
| Lower to Starting Position | Slowly lower your chest, arms, and thighs back to the mat. |
| Repeat | Perform the exercise for the desired number of repetitions, maintaining control throughout the movement. |
Benefits of Superman Exercise for Arm Strength:
| Back and Arm Toning | The lifting motion engages the back, arms, and shoulder muscles, contributing to toning and definition. |
| Improved Posture | Strengthening the back muscles helps improve overall posture, reducing the risk of slouching. |
| Full-Body Engagement | The Superman exercise is a full-body movement that activates multiple muscle groups simultaneously. |
| Core Stability | Engaging the core muscles during the exercise enhances stability and supports spinal alignment. |
| Increased Range of Motion | Regularly performing Superman exercises can improve flexibility and range of motion in the arms and back. |
Variations of Superman Exercise:
Add variety to your Superman exercise routine with these variations:
| Superman Pulses | Perform small, controlled pulses at the top of the Superman position to intensify the muscle engagement. |
| Alternating Superman | Lift and lower one arm and the opposite leg simultaneously, alternating between sides. |
| Superman with Arm Circles | Add arm circles while lifting to engage the arms and shoulders even more. |
| Superman Plank | Transition from the Superman position to a plank position and back, combining two practical exercises |
It’s crucial to be consistent when exercising at home. Include these arm exercises without the need for any equipment in your program two or three times per week. Increase the tension incrementally as you go. For optimal outcomes, listen to your body, stay hydrated, and mix exercise with a balanced diet. Happy Arms: A No-Equipment Workout at Home!
You may also give a look for “arm exercises with gym equipment” at Best Home Gym Equipment for Weight Loss


One thought on “Best Arms Workout at Home Without Equipment”